2015-07-19

Flying the Gennaker (Asymmetric Spinnaker) on the Catalina 22

Catalina 22 with the gennaker (asymmetric spinnaker) flying.

We went out for a sail with our Catalina 22 and flew our gennaker (asymmetric spinnaker) for the first time. Besides our normal crew, we took Sandi's oldest son, Devon, who shot all of the photos in this post.

We left about 3:30 p.m. and got back in about 7 p.m. For the first part of the sail, things went pretty typical. We headed north up the lake with the wind coming from the south. We attached the lines to the gennaker, and raised it. On the third try, after fixing various line problems, we finally got it up. We lifted the sock, and it was out flying. With a few adjustments, we got it taking the right shape.

We use the same halyard, sheets, and downhaul as the symmetric spinnaker (see July 4th posting), but the one new rigging item is the parrel beads. We got ours from Neil Pryde Sails. Parrel beads are a set of balls that go around the furling jib that allows the gennaker to move up and down and rotate without damaging it. We do need a way to keep the furling jib wound tight, though, to allow the beads to move.

Young bald eagle.

Circling around us was a young bald eagle, trying to fish. It was just getting its white head and tail. As mentioned in posts from last year, now there are quite a few bald eagles fishing on Lake Washington, and while the younger generation is used to seeing them, the older sailors view them like seeing a live dinosaur.

As we continued to sail, a beautiful C&C 41 came along side us. With so much more sail, we expected it to leave us in its wake, but with the gennaker out, we were keeping up.

We doused the gennaker and headed back south. The C&C 41, eventually caught up. The captain challenged us, but we had to wave as it sailed away.

C&C 41 sailing off.
Wind speeds and directions at Sand Point.
Modified from iWindSurf.

As we headed south, the wind picked up, and started radically changing directions. The chart of the wind speeds and directions around that time shows what we got ourselves into, with sustained winds of 2 to 12 mph, and gusting as high as 17. The wind was changing direction all over the place.

At one point, the wind radically changed direction, and gusted to 17 mph at the same time. It caught us unexpected, and Sandi had to fight a little to keep us under control. We finally headed into the dock. There were high waves, but the crew operated well and we got her docked.

A view from the deck.

2015-07-07

Sailing to Lake Union

We went for our longest day of sailing yet. We set sail at about 12:30 with our normal crew of Conner, Taylor, Greg, and Sandi. The wind was coming from the south, and we headed in that direction, tacking down the lake. It was the wrong direction, however, for flying our spinnaker again.

Headed south in Lake Union. The Space Needle just
off the port bow.

After an couple of hours heading toward 520, we dropped sail and motored our way through the Lake Washington Ship Canal, the Montlake cut, Portage Bay, and into Lake Union. We passed under drawbridges that have enough clearance that they do not have to opened for us. We landed on the south end of Lake Union, and tied up to the dock there. Dinner was at Duke's Chowder House at Chandler's Cove.

Our route. The red line was our approximate path.
Map © OpenStreetMap contributors

The Lake Washington Ship Canal was a huge construction project completed between 1911 and 1934, creating a water passage between Puget Sound and Lake Washington, by way of Lake Union. Nothing like it would be allowed now because of the environmental impact, including dropping the water level in Lake Washington by almost nine feet. The Montlake Cut is a 110 foot wide man-made passage between Portage Bay and Lake Washington.

The crew. Fantasia tied up at Chandler's Cove.

After dinner, we reversed direction. While we were having dinner, the winds had shifted and were now coming from the north. We briefly put up the sails in Lake Union, then dropped them again. The Montlake Cut is too narrow to be sailing in, with many boats making their way from Lake Union and Puget Sound to Lake Washington. There were sailing classes with Lasers from Seattle Yacht Club in Portage Bay. There were sail boats from the University of Washington boat house. There were really inexperienced sailors trying their hardest to capsize a small sail boat and failing.

After we got back into Lake Washington, we raised sail and tacked our way north. The winds were just about perfect: strong, but not overwhelming. The sun had a slight haze over it, apparently from forest fires in British Columbia, which kept it a little cooler. There were lots of sailboats out, and only a few powerboats. The seas were too heavy for the power boats to pull shark bait behind them (what Greg calls kids on inflatables). For a while, we played with another Catalina 22. We nicknamed the captain Crazy Ivan, as he did things like take his boat in tight circles, or pull his boat ahead of ours on the same tack.

We pulled into the dock as the sun was headed near the horizon after 8 p.m. A long day, but one of the most enjoyable we have had sailing.

2015-07-06

A Busy Day of Not Sailing: Mounting The Outhaul and Tiller Stay

Spring line to the concrete
post.
Whipping indicating where to tie up.

We did a lot more maintenance on the boat today.

We bought another snubber yesterday for our fifth dock line. This allows us to keep the boat nicely away from the dock in all directions. Our host moved a cleat for us on the dock, and the new position really helps. We also are whipping the dock lines to mark them at places so that we can very quickly get them adjusted just right when we pull in. This will make docking faster.

Pulpit eyes for spinnaker sheet blocks.

We put on new pulpit eyes on the stanchions for the spinnaker sheet blocks. Catalina Direct says that Catalina 22s have always used 1" thick tubing for the stern pulpit, but ours is made of 7/8" tubing. The pulpit eyes that we got were too large. They worked for our first time out, but we needed hardware that fits for a more permanent mounting. We found some hardware that will work at Fisheries Supply that fits the 7/8" tubing when used with a couple of D-shackles.

Blocks for the mainsail outhaul.

We mounted new blocks for the mainsail outhaul

Tiller stay.

And finally, we added our new tiller stay tiller controller. This was from a kit from Catalina Direct. They have several videos of projects to perform on a Catalina 22. The demo for installing this is on the Video Projects DVD volume 2. This allows the captain to leave the tiller for short periods without losing heading, as well as not having to fight the tiller so much. It also means that we do not have to tie up the tiller when we dock. It took us maybe two hours to install the whole thing. We did not do the complicated epoxy thing on the tiller.

Note that the video and directions are not clear on where to mount the fairleads that direct the line to the tiller. They say to mount them one inch inboard from the thingy on the side, but not how high off the seat. We mounted them just a little too low when the seat cushions are in place and will need to move them up an inch or so.

2015-07-04

Flying the Symetrical Spinnaker on Fantasia

Our first time flying the spinnaker.

It has been Sandi's goal for quite some time that we would fly our symmetrical spinnaker on July 4th, Independence Day, of this year, for reasons that should be apparent from the accompanying pictures. It was looking like we were not going to get all the rigging in place until after the 4th, but everything came together and it worked.

This is a fairly big deal for us, because nobody on board has ever flown a spinnaker. All knowledge has been acquired by reading articles and books, and viewing videos online. (Possibly the best video on using the spinnaker is this one, Spinnaker Sailing, on YouTube.) We knew that there is some knowledge that you only get from actually doing something, so we were not sure that we even would make it work.

While still at dock, we checked our rigging and re-tensioned some stays. Also, a cleat had been moved for us on the dock to allow better tying up, so we adjusted our dock lines.

Before heading out, we planned on putting the spinnaker out on the port side. We planned that we would not bring out the jib until we were done with the spinnaker. So we fastened the turtle (spinnaker bag) to the life line on that side. We attached the snapshackles to the tack and clew of the spinnaker. Fortunately the port and starboard corners of the spinnaker are color coded.

For this season we are using the jib halyard to raise the spinnaker. For next season, we will probably add a head to the mast that has a separate ring and block just for the spinnaker. We have a furling jib, so the jib halyard is unused otherwise. We fastened the jib halyard to the top of the spinnaker sock. We tucked the jib sheets around the forward cleats so that they'd be low and out of the way.

We left the dock and motored out. We dropped the swing keel and raised the mainsail. Then we brought out the spinnaker pole and attached it to the mast ring. We attached the topping lift to the top of the spinnaker pole and the downhaul to the bottom and ran the port spinnaker sheet through the end of the spinnaker pole.

Spinnaker wrapped around the jib.

We then got ready and tried raising the spinnaker sock. First try failed as one of the lines was on the wrong side of the downhaul. Second try found another line interfering and had to be adjusted. Third try also failed, as we had failed to put the starboard spinnaker sheet around the front of the jib. Fourth try got the spinnaker sock to the top of the mast. The sock was lifted and the spinnaker started flying. There was not enough tension on the sheets though, and the spinnaker promptly wrapped itself around the jib! How do you solve that?

Turns out that if the slack is taken in on the sheets, and the helm varies a little off the wind, that enough wind catches the spinnaker to cause it to unwrap itself. And suddenly the spinnaker filled and was out flying! A little adjusting the sheets and downhaul and off we went, flying south down Lake Washington. The captain had to adjust to the fact that we had both the mainsail and spinnaker flying, but she soon figured that out.

Success!

Our spinnaker is red, white, and blue, which in the U.S. is very patriotic. We had people in power boats going by and blasting their horn!

After a very fast run down the lake toward Kirkland, we took down the spinnaker. Not completely without problems. The spinnaker sock did not want to come down. After a little head scratching, we figured out the problem: the sock lifting line was still cleated. You can pull on the line to bring it down as hard as you can and it will not budge when the lifting line is cleated!

The sock came down. Then the spinnaker came down and was folded back into the turtle. Unfastened the sheets and halyard, took it off the lifelines and down the forward hatch. The sheets and halyard get clipped to rings and stays to keep them from flopping around. We unfastened the spinnaker pole from the topping lift, downhaul, and mast ring, and stowed it below. Then we were ready to bring out the jib and tack back up the lake.

However, when the spinnaker wrapped itself around the jib, it messed up the furling of the jib and practically tied the jib sheets into knots. It took us a while to get that straightened out. After tacking back up, we pulled into the dock, exhausted but feeling very satisfied that all this work has paid off.

2015-07-02

Mounting a Spinnaker Track on a Catalina 22

Our nifty Forespar spinnaker pole. 8' x 2".

We have been continuing to rig Fantasia, preparing to raise the spinnaker for the first time. The one piece of the puzzle that we were still missing was the ring necessary to attach the spinnaker pole to the mast. Today we took care of that piece. We mounted the spinnaker pole track and ring to the mast.

We ordered the parts from Catalina Direct. It came with a 47" x 1" track, two end caps, the car with the ring on it, 15 machine screws, a drill bit, and a tapping tool. If you knew exactly what you needed, you could probably save a few bucks getting all of this separately, but the advantage of ordering the kit is that you know everything is going to work. You will have the right sized drill bit and tapping tool, and the right kinds of screws, as well as the right quality of track.

No instructions came with the kit. However, we followed the nice article from the Fleet 20 newsletter, Installing a Spinnaker Pole Track on the Mast, by Dale Mack, which worked perfectly. We are going to describe our experience, but highly recommend reading that article.

We measured up and located the center of the track at 42" off the deck on our old-style Catalina 22. We marked the bottom of the track on the mast and carefully drilled the bottom hole. The tapping tool then puts threads in the hole that leads into the mast. The article shows a nice handle on the tapping tool, but we did not have one, and did not want to go get one. We found that a small pair of vice grips worked. We then screwed the bottom of the track to the mast.

Track on the front of the mast with the spinnaker ring car.

It really helped to have two people. One held the track to the mast, and handed parts and tools to the person doing the drilling and tapping. The boat was at the dock, but there was fairly heavy seas, and quite a few power boat wakes, so it would have been pretty easy for a part or tool to go into the water. We almost lost the tapping tool once, even with two people, which would have finished the day. If you can do this with the boat out of the water, it is a little easier.

Then the top hole was drilled, tapped, and screwed. Then we proceeded to drill, tap, and screw the other holes. We then put the car on the track. The track came with two end-caps, but we could not figure out how they fit. They seemed a hair small. We just left them off.

We then could attach our Forespar spinnaker pole to the ring to test it. We have an extra halyard line that runs to the top of the mast that we are using for the topping lift. When the mast is down next, we will mount a separate topping lift line, but for now this works just fine.

We clipped the snapshackles the topping lift and the downhaul to the spinnaker pole. The pole lifted nicely and the downhaul controlled it.

All together, it took about two hours to do the whole job.

2015-06-21

New Boom Topping Lift

Cup holder hooked on the life line.

This weekend, we were planning to sail, but spent the weekend working on the boat instead. We found a new favorite local supply store: Fisheries Supply. For sail boats, they have a better selection of parts than other local stores. Prices seem reasonable, and we do not have to wait for online orders. Harken products were on sale this weekend. We loaded up on the blocks and things we need for our topping lift and spinnaker and gennaker rigging.

We found some nice cup holders that fasten to the lifelines. We have been looking for something like them for a while.

Boom topping lift.

Sandi installed the rest of the new topping lift for the boom. We had installed the Catalina Direct D2180 wire topping lift before we put the mast up, but the line holding the boom was jury rigged. We now finished the job. Sandi screwed an eye strap on the aft port side of the boom. A Harken 224 micro-block was attached to the thimble on the end of the cable of the topping lift. Then a Harken 233 micro-cheek block was screwed on the starboard side of the aft portion of the boom. A Ronstan RF5101 V-cleat was screwed a little further forward on the starboard side of the boom. A 1/4" line is tied to the eye bolt on the port side, runs up through the block on the cable, then back to the cheek block on the starboard side and then forward to the cleat where it is tied off.

We actually don't like the Ronstan RF5101 V-cleat for this purpose as it does not seem to hold well, and will likely replace it with something else.

Last season we cheated by using the jib halyard as the topping lift. Since we have a furler, we are not using the the job halyard for its intended purpose. However, this season we expect to use it with the spinnaker, so we decided to do the topping lift the right way.

2015-06-15

First Sail of the Season

Conner modeling his new personal
floatation device
New flares.

We took Fantasia out for the first sail of the season. Everything went smoothly, pulling out, tacking and coming back in. The crew is working pretty well together. The boat is good. The bald eagles were out fishing.

Distress flag.

Before this sail, we had acquired new safety gear. We have new flares for the flare gun. We have two more of the light self-inflating personal floatation devices. These were on sale at West Marine. We also got an emergency flag.

2015-06-06

Put Fantasia in for the Season

We put Fantasia in for the season. Our hosts offered their dock again on Lake Washington. Putting her in was unusually undramatic. We connected up, trailered her to the boat launch, raised the mast in the parking lot (using our mast-raising system), backed it up and launched. It is almost like we knew what we were doing. The only mistake in the whole process was forgetting to release the tie down straps holding the boat to the trailer until the trailer was in the water. It does not float very well when those are still on. Greg had to wade out to release them. He learned from past mistakes, though, and removed the cell phone from his pocket before doing so!

We just motored to the dock and tied up. No sailing today.

New trim on the transom, just below the tiller and behind the rudder.

During the off-season, we fixed some things. There was an original trim piece on the transom that had completely disintegrated. We ordered a new one from Catalina Direct and put it on. The new one, however, did not fit around the existing hardware on the transom. Sandi used a Dremel tool to reshape it and drilled new holes in the plastic to fit the existing holes on the transom. It looks much better than the one that was there.

Before raising the mast, we attached a new cable topping lift for the boom to the mast. We removed the cotter pin to put it in place, but had to go get a replacement cotter pin. We promptly dropped it in grass and spent the next 20 minutes looking for it. We later got a bunch of cotter pins so that would be less annoying. Connecting the cable to the boom is just jury rigged for the moment, but we will fix that later.

The Boom Vang.

We have a new boom vang. The hardware already was in place for one on the mast and boom, but no blocks. We got a nice one from Catalina Direct, but you can just buy the Harken blocks and get some line. This will not save any money unless you can get the blocks on sale, though.

Our goal for this season is to get the gennaker and spinnaker flying. We have had them in the sail bags since we got the boat. It is unlikely they have ever flown over our boat, as our boat is missing the necessary rigging. The spinnaker was obviously bought used, as it has sail number for a different boat on it.

We are still figuring out the rigging necessary for the nylon sails. We bought a nice Forespar spinnaker pole, but currently there is no way to connect it to the mast. We also bought an ATF spinnaker sock. We will talk more about our spinnaker and gennaker rigging in later posts as we get them in place.

We are looking forward to another season of sailing.

2014-10-27

Took the Boat Out for the Winter

Having saved our boat from disaster the day before, we decided we needed to take the boat out for the winter as soon as possible before another wind storm hit. Since there was no severe wind today, Sandi took the day off work and we brought it out.

The backup motor.

We staged our towing vehicle and trailer at the boat ramp, then went down to where the boat was and cast off. The water the day before had been 4' waves. Today the water was as flat as the heart monitor on a corpse. We decided we were not even going to try to sail. Instead we just motored up to the boat ramp.

We experienced some motor trouble as it has been cutting out at low speeds. As we got near shore, the motored died and we actually paddled in the last twenty feet. The boat ramp was nearly deserted, so we felt no pressure as we maneuvered the boat onto the trailer using just lines, and using the boat hook as a boat pole.

We then brought the mast down with our mast raising system. After securing everything, we hauled the boat to its winter storage spot. Examining the boat out of the water, we verified that there had been no damage from the day before.

Thus concludes our first season sailing Fantasia. We will have more adventures doing maintenance during the off season, but we will not be in the water again until spring of next year.

2014-10-26

Boat Disaster Narrowly Avoided

We narrowly avoided seriously damaging the boat in a wind storm this weekend. As first-time boat owners, we were attentive and worried about our new boat with the first couple of gusty days in the 30+ mph range, but became more comfortable as we'd weathered each wind or rainstorm without any issues.

From October through about March each year, Western Washington periodically experiences severe wind storms. These storms generally have little or no precipitation, but the wind speeds can be very high. Normally, these heavy winds blow down from the north as a front pushes through, and the geography of the lake provides a natural breakwater that protects our moorage. But in this weekend's windstorm, the high winds were driving the waves from the south, bearing down on our boat with the full force of every wave. Just to the south of us, Hunts Point measured gusts as high as 51 mph. Further south, in Oregon, they measured gusts as high as 94 mph from the same storm. These hurricane force winds knocked down lots of trees in our area and there were power outages throughout the city.

On Sunday morning, the winds had died down quite a lot, but they were still blowing pretty strong across Lake Washington with winds still coming from the south. We went down to our dock to see the boat, not because we were worried about how it had weathered the storm, but to show a friend who was visiting our lovely Fantasia. As we headed down towards the dock, from a distance, we could tell things were not normal. We could see the mast swaying side to side, more than ever before. Once we could see the dock and the boat, it became clear why. There were swells about 4 feet tossing the boat around continuously and the starboard aft line had snapped, allowing the aft of the boat to swing out away from the dock with every wave.

The combination of up and down motion of the boat from the large waves, along with the intense stretching from the force of the waves, had caused the aft mooring line to wear against the cleat. While the line snubbers helped, they weren't enough to absorb all the force from these strong waves. This created a situation where our lines were rubbing up/down and being stretched across rough metal cleats. The starboard aft line was shredded, rubbed through until it finally snapped. The starboard bow line had held, but just barely. It was worn about 2/3 of the way through. I don't think it would have survived another hour.

If that starboard bow line had snapped too, the boat would have been held just by the downwind lines on the port side of the boat. From the port bow, we tie off to a concrete post which is situated about five feet aft of our bow. When launching and docking, we have to pivot the boat around this post since there is also a hydraulic boat lift directly to the port and aft of where we tie up. If the starboard bow line had also snapped, each incoming wave would have been smashing Fantasia up against that concrete post. The fiberglass hull would have been severely damaged and it is quite possible the boat may have sunk right there.

Needless to say, we were very lucky that we went down to have a look at the boat early Sunday morning. After some frantic scrambling, we managed to re-secure the boat while it was still being tossed around violently. We attached some new moorage lines. Greg tied the remaining good part of the bow line, with the snubber attached, to a much thicker line with a sheet bend. A sheet bend is a great knot for joining two lines together especially when they are different thicknesses. There are other knots that may have worked well too, but we had very little good line left on the section with the snubber.

Examining the boat as best we could in those conditions, we could detect no damage. The wave action made it impossible to even attempt to get the boat away from the dock, so we secured her the best we could with a few much heavier lines. We reviewed the weather forecast and decided not to push our luck. With more heavy winds predicted for Tuesday and our seasonal rains in full swing, Monday would be the day that we would pull Fantasia out of the water and trailer her for the winter.

Wind storms like this one do happen regularly here in the Pacific Northwest throughout the fall and winter and sometimes they can be wicked. In 1979, a wind storm hit the Hood Canal region to the west of us with sustained winds of 85 mph and gusts estimated at 120 mph. The floating bridge on Hood Canal sank in the storm, and Douglas firs, 3' thick, snapped like popsicle sticks. Fall and winter weather in the Pacific Northwest can be a challenging environment for any moored boat.

Valuable lessons learned:

  1. Not all windstorms are created equal. Take into account the effects of geography, wind direction and how much protection from wave action your moorage provides.
  2. While your mooring lines may be sufficiently rated for the boat you have, they may not be nearly enough for the weather you might need to endure.
  3. We either need to have well protected moorage, behind a good breakwater or we need to take the boat out of the water before fall/winter weather sets in (no more waiting for one last sunny day).
  4. Not all cleats are created equal. Some are very smooth, but others are rough to provide more friction for stability. That friction can bite you if it damages your lines in heavy weather.
Tip: Slice a section of rubber garden hose and wrap it around your docking line anywhere there may be a friction point, like a cleat or edge of a dock. It will protect your lines and is cheaper to replace than good quality docking lines.

2014-10-12

Cheap Wind Direction Indicator

Yarn tied to the shroud.

We went out for a sail. Nothing too different from many other times we have been out on the lake this season.

When sailing, it is useful to know what direction the wind is coming from. You can add expensive wind indicators to the top of the mast. We have plans to do that some time. Until then, we have a really cheap and easy way of finding the wind direction that works pretty well.

We acquired a skein of yarn, that had both blue and red at different points on the length. We cut off about 10 inches of each color and tied them to the rear shrouds about six feet off the deck. We put the red one on the port side and the blue on the starboard, to match the colors of the tell-tails the jib. You do not really need two different colors, but we like the correspondence.

Now we can just look at the yarn to tell the wind direction. It is useful to have more than one, because occasionally one will get stuck to the shroud for a little while.

Boating Safety Equipment

Every boat in Washington State is required to have certain safety equipment aboard. For boats in our size category, this is the equipment we need on board.

Personal Flotation Devices (PFDs)

We require that everyone aboard wear a Personal Flotation Device (life preserver to landlubbers) at all times above deck. If the person is in the cabin, we require that they keep one handy, but not necessarily on, unless the person is 12 years old or younger, in which case they need to keep it on at all times. Washington State's law is actually less strict than this, and merely requires that everyone have a PFD at hand.

All of our life vests are Type II Near-Shore Life Jackets. We have two that use CO2 canisters that inflate upon immersion in water. These are more comfortable than other types. We will be acquiring two more of these by next season so that all crew members will have them.

We also have a Type IV horseshoe throwable PFD on a bracket on the port side railing. We have a 100' of light floating line attached to it.

Visual Distress Signals

Washington State WAC 352-60-040 follows the US Coast Guard regulations. They require that you have a Visual Distress Signal available for daylight and another for night time. For daylight, you can have an approved Distress Signal for Boats Orange Flag or various kinds of flares. For night time, you can have an approved Electric Distress Light for Boats, or various kinds of flares. Some flares can act as both daytime and nighttime Visual Distress Signals.

ACR DistresSOS 1842 Electric Distress Light

Here is the drawback to flares: They are expensive and they have to be replaced every 42 months. To meet the minimum requirements, you can get by with just a Distress Sign for Boats Orange Flag and the Electric Distress Light for Boats. However, oddly as it seems, nobody seems to be making a Coast Guard approved Electric Distress Light for Boats any more. This seems like a business opportunity for someone! ACR Electronics made the Coast Guard approved DistresSOS (product 1842), but it is no longer being made. Other lights do not have the Coast Guard approval, so will not meet the state requirement. I bought one of the ACR lights on Ebay used for about $30 plus shipping.

The flag is orange and has a square and a circle in black.

Flares come in various forms. If you get them to act as both day and night Visual Distress Signals, there are a couple of types that will qualify. You will need three in total, although you can mix and match what kinds you have on board.

Hand-Held Red Flare Signals (160.021)
Parachute Red Flare Signals (160.024)
Hand-Held Rocket Propelled Parachute Red Flare Signals (160.036)
Red Aerial Pyrotechnic Flares (160.066)

The critical label that makes this the only approved Electric Distress Signal

Although flares came with our boat, they expired in the early 1990s, so are not legal. The Coast Guard regulations require they be replaced within 42 months from the date of manufacture. We will replace all of our flares by next season, but with the light and the flag on board, we do not necessarily need to replace them at the Coast Guard's replacement rate.

Fire Extinguisher

We have a Type B fire extinguisher on board. This is required by Washington State law.

Air Horn

We have a hand operated air horn. This must be loud enough to be heard for half a mile.

2014-10-05

Seattle Rainfall

Sailboat with spinnaker flying

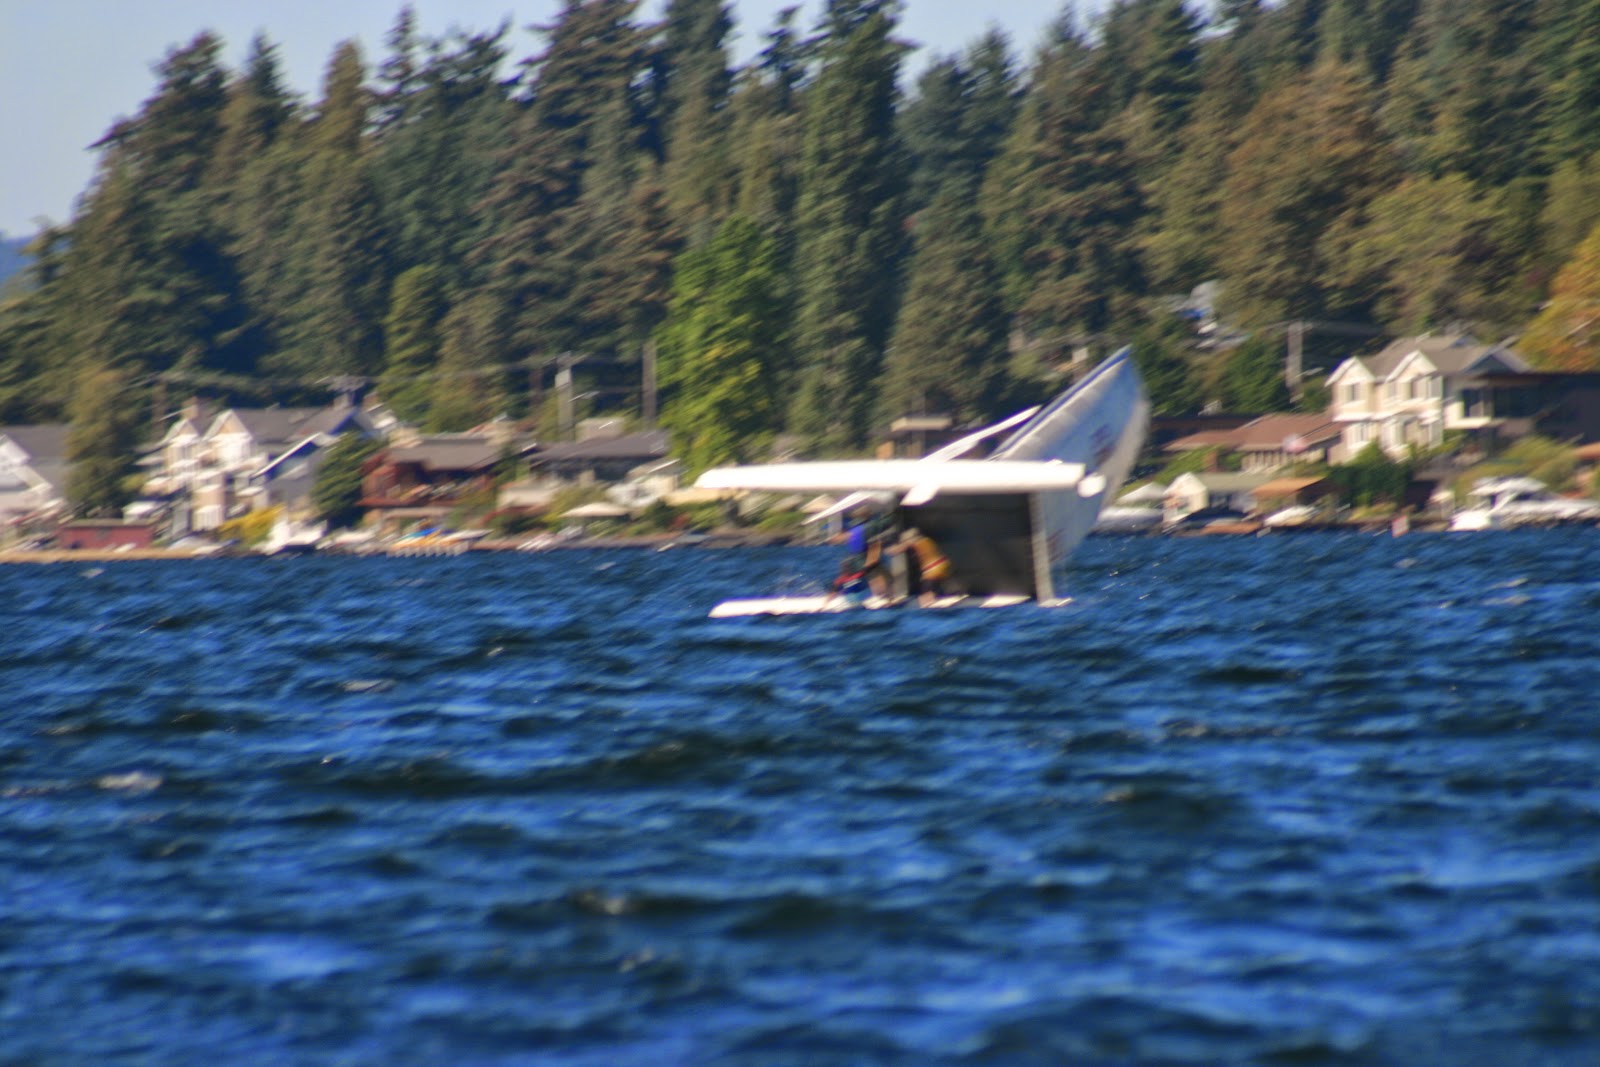
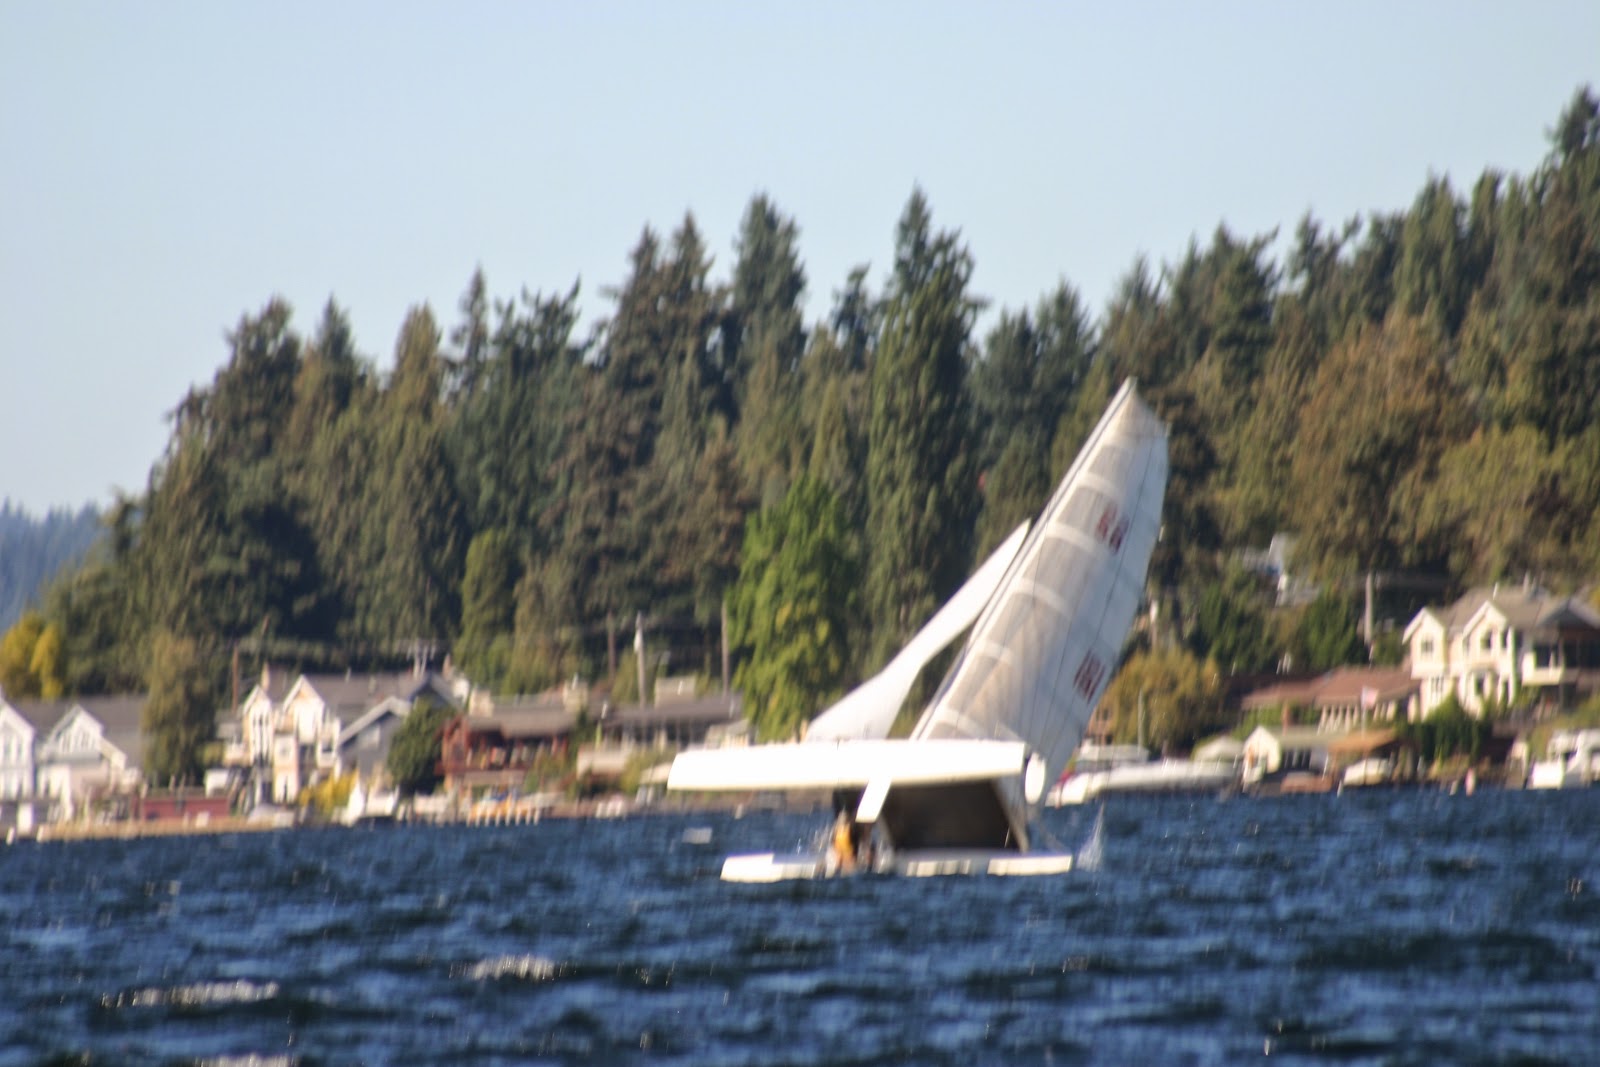
We went out for a sail, taking Greg's parents. It was a beautiful day, and there were more sailboats on the lake than power boats, many with their spinnakers out. We were briefly entertained when one sailboat lost control of the spinnaker lines as they tried to raise it and they struggled for a while trying to reclaim their spinnaker as it flew about.

These beautiful days are going to become more infrequent here soon. The Seattle area is well known for its rainfall, but much of the rest of the country thinks that means frequent thunderstorms and heavy rain. It is not like that at all.

Here is a Seattle joke: A guy visits Seattle and stays at a hotel. He comes out of the hotel the first day and it is raining. The second day it is raining. The third day it is raining. He sees a kid on the street and says, "Hey, kid, does it ever stop raining around here?" The kid replies, "How should I know, I'm only five!"

Another Seattle joke: We do have a summer in Seattle. Last year it was on a Wednesday.

Temperate rainforests in North America
(from Karl Udo, cropped, GFDL)

These jokes are something of an exaggeration, of course. Seattle falls within the Pacific temperate rain forests ecoregion. This rain forest extends from Northern California, all the way to Alaska. In a rain forest, there are really only two seasons, the rainy season and the dry season.

In Seattle, the wet season begins some time in September or October and ends about May or June. During the rainy season, we have as many as 19 days a month with measurable rainfall. There are many other days with no rain, but no sun either, being clouded over the whole day. Thunderstorms are infrequent, and even when we get them, they are usually short and unspectacular.

During the dry season, there is still measurable rain, but tapers down to only about five days a month. People here complain that Californians come up here for a vacation during the dry season, see how nice it is, and move here. Then it starts raining and they gripe for the entire rainy season.

We recently watched a TV series called "The Killing" that is set in Seattle. It is obvious to any Seattlite that the writers and producers are not from here. It is actually filmed in Vancouver, British Columbia, Canada, not Seattle. However, Vancouver has almost exactly the same weather patterns as Seattle, so that does not explain the rain in the show. The first sign of non-Seattle production is they have a guy carrying an umbrella. We just do not do that.

Seattle's rain is typically more like the mist machines in the lines at Disney World. It gets you a little damp, but it evaporates almost immediately. The amount in inches is negligible. However, in The Killing, it is obvious that they film using rain machines, because the rain comes down like it does in Florida: heavy. There are exceptions in Seattle where the skies open up, but it is infrequent. In Seattle, you are more likely to wear a lined rain coat than carry an umbrella.

J F M A M J J A S O N D
5.6
47
37
3.5
50
37
3.7
54
39
2.7
58
42
1.9
65
47
1.6
70
52
0.7
76
56
0.9
76
56
1.5
71
52
3.5
60
46
6.6
51
40
5.4
46
36
Average high and low temperatures in °F
Precipitation totals in inches

You need the lining for warmth. Seattle has an average temperature of 76°F during August, the hottest month of the year. We get little snow, though, because the average temperature during the December through February, the coldest months, is 36°F. The coldest days usually do not have snow because clouds trap in heat, and you need clouds for snow. We get this equilibrium where it might snow, but the clouds hold in enough heat to bring the temperature above freezing, so it just rains.

When it does snow, Seattle is frightening. Since it happens infrequently here, drivers do not know how to drive in it. The first thing they do is jam on the brakes and slide into the thing in front of them, rather than pumping the brakes and steering. The city shuts down with 2" of snow, as nobody can get to or from work with the freeways jammed with accidents. At one particular intersection at the bottom of a hill, in one hour during a snow storm, Greg witnessed 17 accidents.

In a typical year, we might get one week above 90°F and one week below 32°F. The hot is actually more of a problem than the cold. Everyone has heat, but most houses, including ours, have no air conditioning. When it is above 90°F, it is miserable. We have an air conditioner for the hottest room in the house, but no central air.

During the rainy season, we may go days without seeing the sun. This causes problems for some people. They get Seasonal Affected Disorder, which is a kind of depression induced by the lack of sunshine. The lack of sunshine from the clouds is compounded by the fact that we are at about 47° latitude. This causes the sun to set at about 4:10 p.m. on December 5th. On the other hand, it does give us very long days during the summer dry season. You can still hit a tennis ball without lights after 9:30 p.m.

All of this makes for perfect sailing conditions in the dry season, and miserable conditions in the rainy season. We are starting to make plans to pull the boat out some time in the upcoming weeks.

2014-10-03

Lake Washington Water Level

We went out for a short sail for about an hour out on the lake. We hadn't been on the water or visited the boat for almost two weeks, having been out of town. As we got to the boat, we noticed that it was riding much lower in the water, with the fenders almost too low to protect the boat from the dock. This is due to the annual lowering of the lake level.

Lake Washington is fresh water, but has two locks that exit into Puget Sound. Some time next season, we expect to venture out through those locks in the boat. The Army Corps of Engineers controls the locks and flood gate, which also controls the water level in the lake. During the winter, they normally lower the water level about two feet from the level they keep it at during the summer.

Lake Washington Water Levels

The extra water during the summer serves several purposes. The lake drains about 8 million gallons of fresh water every time they use the large lock. The water also serves the fish ladder that allows salmon to traverse the locks. During the winter, the lower level keeps down erosion on the shores, as well as allowing repairs to docks and other lakeside fixtures. We had a choice of another docking space, but when we took into account the lower water level in October, it was just too shallow.

In just the last three days, the Corps has let water through the flood gate to lower the lake level by about three inches. That is a huge amount of fresh water from a 26 mile long lake. I'll bet the people experiencing the drought in California wish they could acquire some of that!

Round turn and two half-hitches.

After pulling back in, we adjusted all of the fenders to ride a few inches higher to put them between the boat and the dock.

Tip: To tie a fender to a life-line, you will want to use a "round turn and two half-hitches.". The picture shows this knot. This is one of the essential knots to know.

We will be pulling the boat out for the winter soon, but we still have a few good days of sailing left.

2014-09-20

Sailing in Stronger Winds

Sail boarder on Lake Washington

We went out for a sail in somewhat stronger winds than we had before. Although it was a beautiful Saturday afternoon, there were very few boats on the lake, not even power boats. There were, however, quite a few sail boarders. With the winds gusting past 10 knots, the sail boarders were almost literally flying over the water.

A San Juan 27 came by at one point, heading north up the lake.

Righting a capsized hobie cat 1

Righting a capsized hobie cat 2

Righting a capsized hobie cat 3

Righting a capsized hobie cat 1
Righting a capsized catamaran

A catamaran was planing at top speed. It tried to make a sharp tack at speed. As we watched, it rose on one pontoon and seemed frozen there for what seemed like a minute, before finally capsizing, tossing the three occupants into the water. We took these photos as they righted it and went back to having fun.

We got our boat up to 6 mph (5+ knots), about 2 mph faster than we had gone before. We managed to keep our speed up through most of our tacks.