This is a summary of all of the information necessary to install a Raspberry Pi on a boat. Although there are a lot of steps, the process is relatively straightforward, especially with the script provided.
Some pieces have been covered before on this site, but this will put it all in one place. The links to Amazon are affiliate links that will contribute a small amount to support this site.
Pre-requisites
This article makes the assumption that you already have:- A NMEA 2000 network. This should have at least a GPS on it.
- A MMSI. This number identifies your boat. You can get one for free from BoatUS, but if you are going to travel internationally, you need to get one from the FCC.
- A WiFi router with a connection to the Internet. You will need to know the router name and the password. We use a Galaxy Tab A7 Lite configured as a mobile hotspot. This adds about $20 a month to our cell phone bill, and allows constant connection of the Internet from anywhere there is a T-Mobile cell tower. T-Mobile frequently gives them away with a two year commitment. Some marina WiFi routers will not work for this as they block direct connections between devices on the router. The router should allow the laptop to connect to Raspberry Pi and both the laptop and the Raspberry Pi to reliably connect to the Internet.
- A laptop computer with WiFi, Remote Desktop Client, and SSH. This will provide your connection into the Pi through SSH or Remote Desktop to configure it. We use an older Microsoft Surface Pro which takes up less space on the boat than most laptops. You can find them used on eBay. The laptop needs to have SSH installed on it. SSH is an optional component in the Windows operating system, so you may need to install it. Windows computers should come with Remote Desktop Client.
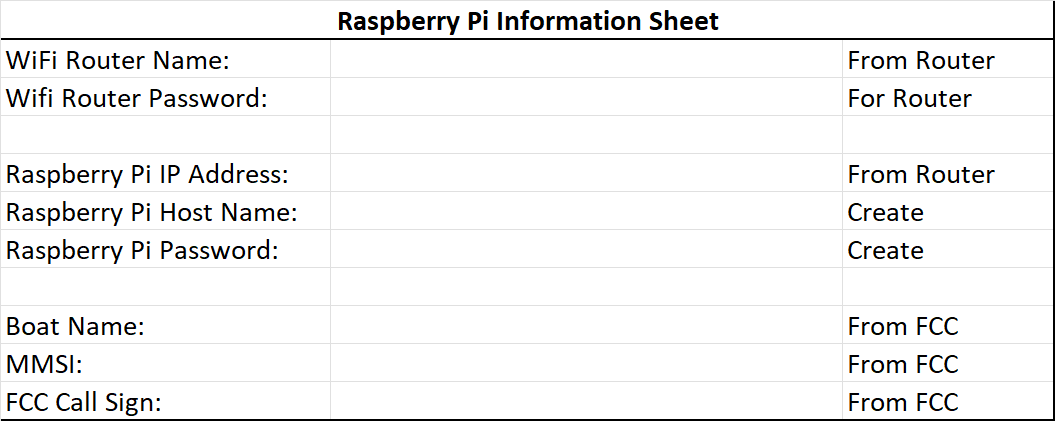
|
| Gather and record this information |
The Hardware
You will need the following hardware. You may have some of it on hand.
- A Raspberry Pi. There are several models, but putting a more powerful one on the boat makes sense as you can add more monitoring.
- A Pican-M hat board. This provides the input from the NMEA network, including the 12V power from the network.
- A case for Pi and Pican-M. This encloses both and provides cutouts for all the necessary inputs.
- A NMEA 2000 tee connector. This adds a drop location to the NMEA 2000 network.
- A NMEA 2000 drop cable. These cables come in various lengths. Purchase one that is the shortest length necessary to go from your NMEA tee connector to where you are mounting the Raspberry Pi.
-
A micro SD card. Should be at least 32
GB, but more is better. We managed to accidentally completely fill a 32 GB
card with log files, which made the Pi very unhappy. Note that not all SD
cards are equal. For a system like this, you should get an A2 rated card.
- A micro SD card reader. If your laptop doesn't have one built in, you can get an external one. Most micro SD cards come with an adapter that allows them to be used in full-sized SD card slots.
Make sure the NMEA 2000 network is powered off. Plug the Pican-M hat board onto the Raspberry Pi. Add the NMEA 2000 tee to the backbone. Attach the drop cable to the tee and the Raspberry Pi.
Optional Hardware
For the initial configuration of the Raspberry Pi, you may want to connect
it to a keyboard, mouse, and HDMI monitor. Any USB keyboard and mouse will
work. You will need a
micro-HDMI to HDMI cable to connect
the Raspberry Pi to the monitor. This optional hardware will allow
monitoring and debugging if something goes wrong with the WiFi connection.
To build a NMEA 2000 network off the boat for testing purposes, you can use
this kit. To supply power, you can use
a 12V power supply.You can also use a USB-C cable to power it from some other computer.
Configuring the SD Card
You will need to configure the SD card. For that, the easiest thing is to run the Raspberry Pi imager on your laptop. Follow the steps below. You can also see this video that walks through the process.
-
Plug the micro SD card into the laptop. Make sure that there is nothing
valuable on it, because this process will delete the entire content of the
SD card.
- Download and install the imager from the Raspberry Pi web site.
-
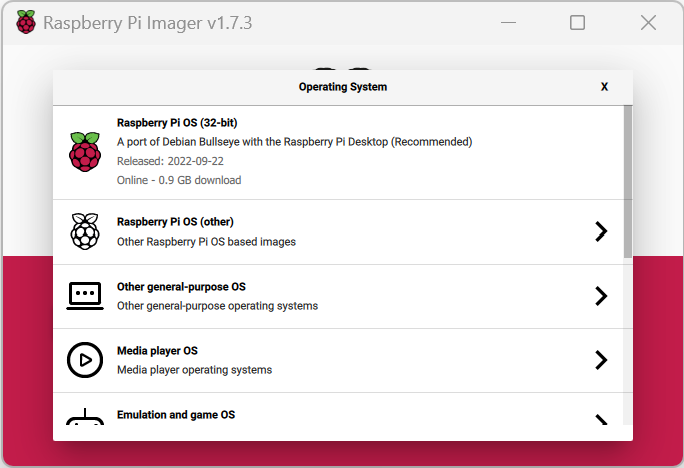
Run the imager.

-
Click the "Choose OS" button and select the Raspberry Pi OS (32-bit)
operating system.

- Click the "Choose Storage" button and select your micro SD card.
-
Click the Gear advanced button in the lower right. Set the following options, checking the checkbox next to each one:

- Set Host Name. This is what you will use to connect to the Raspberry Pi. We recommend the name of your boat. The name can only contain the letters A-Z, the digits 0-9, and the hyphen (-). It cannot contain spaces, so if your boat is named The Blue Whale, use either TheBlueWhale or The-Blue-Whale. The name is actually case insensitive, so capitalization doesn't matter. The host name will have .local appended to the end. Write this down so you don't forget.
- Enable SSH. Use Password Authentication.
- Set Username and Password. Use "pi" for the username, and type a password that you can remember and easily type. You will be typing this frequently. Write this down so you don't forget.
-
Configure Wireless LAN. Type the name of your WiFi router and its
password. Set the wireless LAN country to the
two letter country code of the
location of the router.
Note that the name of the WiFi router entered is case sensitive and must exactly match the given router, including capitalization. If the WiFi does not connect later, check that you got this right.
- Set Locale Settings. Set the Time Zone to a city in your time zone. Set the Keyboard Layout to the layout that is on your laptop.
- Check Play a sound when finished.
- Check Eject media when finished.
- Leave Enable telemetry unchecked.
- Click Save.
- Click the "Write" button. The program will confirm that you wish to overwrite the existing content of the card.
- When it shows it is complete, remove the micro SD card from the laptop.


Logging into the Raspberry Pi and Configuring It
- Make sure the power is off on the NMEA 2000 network.
- Insert the micro SD card into the Raspberry Pi.
- Turn the power on the NMEA 2000 network. You should see the red power LED on the Raspberry Pi inside the case through the vent holes. There will also be a green LED that shows disk activity. The first time you power it on, it will take several minutes before the operating system is fully booted as it has some configuration steps it needs to perform. This varies based on the size of the SD card. A 32 GB card took only a couple of minutes, whereas a 512 GB card took about 15 minutes. If you connect an external monitor, you can watch the progress, although much of the time the screen will be blank. The Raspberry Pi should log into the WiFi router automatically, so check the connection on the router if you can.
- On your laptop, connect to the same WiFi router that the Raspberry Pi is connecting to.
- From your laptop, create a command prompt. In Windows, you can do this by typing "cmd" in the search box on the task bar and pressing Enter.
-
Enter the following command to log into the Raspberry Pi using SSH. You will
need the Host Name and Password you assigned above. If the Host Name is
The-Blue-Whale.local, type this and press Enter:
ssh pi@The-Blue-Whale.local
The first time you do this, it will warn that it has never seen the key before and do you want to continue. Type "yes" and Enter. It should prompt you for a password. Type the password and press Enter. If all goes well, it should log you into the Raspberry Pi. Note that entering the password does not echo or show up as asterisks.What if it doesn't log in?
If it complains that SSH is not recognized as a command, you will need to install SSH as discussed above.
If it responds that it could not resolve the host name, then you will need to connect using the IP address the WiFi router assigned to the Raspberry Pi. This can be a bit of a guessing game if you do not have access to the router or do not have the monitor and keyboard attached to the Raspberry Pi. Find the IPv4 local IP address of your laptop, then try changing the last number of the IPv4 address to others that are nearby. For example, if the laptop IPv4 address is 192.168.1.32, you should try 192.168.1.31 and other nearby numbers. Try to login with ssh pi@192.168.1.31
If it responds that the connection timed out, then something has gone wrong with the network connection between the laptop and the Raspberry Pi and you will need to debug where the connection is breaking down. Debugging that is beyond what we can cover here. -
Download a script that we created that configures the Raspberry Pi and
installs SignalK. Type this command that downloads the current script from
the Internet:
curl -O http://www.xoc.net/downloads/installpi.sh
This command downloads the file and places it into the current directory. -
Run the script as "root". Type
sudo bash piinstall.sh
This script performs the following tasks. After each one, it will pause and have you press Enter before continuing with the next one.- Change the pi to boot to a command prompt instead of to the desktop.
- Updates all the packages on the Raspberry Pi to the latest versions
- Installs nodejs and npm. These are a JavaScript library and a package manager for node packages.
- Installs xrdp packages that allows remote desktop into the Raspberry Pi.
- Fixes a problem with the xrdp packages.
- Installs and configures CanBus packages. CanBus is the protocol that NMEA 2000 is built on.
-
Installs SignalK. The SignalK packages provides a services that turns
NMEA 2000 information into easier to understand XML. It also installs a
local web server that allows management of SignalK applications. The
SignalK installer will ask you several questions:
- Where you want the SignalK configuration installed. You can just press Enter to place them in /home/pi/.signalk.
- The name of your boat.
- Your MMSI.
- Whether you want to use port 80 or port 3000 for the SignalK web site. You just just press Enter to use port 3000.
- If you want to enable SSL (Secure Socket Layer). You can just press Enter to leave SSL disabled.
- Reboots the Raspberry Pi.
Logging in to SignalK
- From the laptop, search for and run the Remote Desktop Connection app.
- Enter the Host Name or IP address of the Raspberry Pi in the Computer textbox. Click the Connect button.
-
You may get a warning about the certificate. You can check the box for
"Don't ask me again" and click the Yes button.

-
The Remote Desktop program will show the Raspberry Pi login screen. The
session should be Xorg, the username Pi, and the password the password you
assigned to the Raspberry Pi. Click OK.

- The Raspberry Pi will show its Desktop. On the top bar click, the "World" icon that brings up the Chrome web browser.
- In the URL line on the browser, enter "127.0.0.1:3000" and press Enter. 127.0.0.1 is the IP address of the local computer, and 3000 is the port number that SignalK listens on for a web connection. This will bring up the SignalK configuration web page."
- In the upper right is the menu icon. From here you can create a login to SignalK and log in. From here you can install SignalK applications that work with your boat.

